Introduction to Laundry Folding Tables
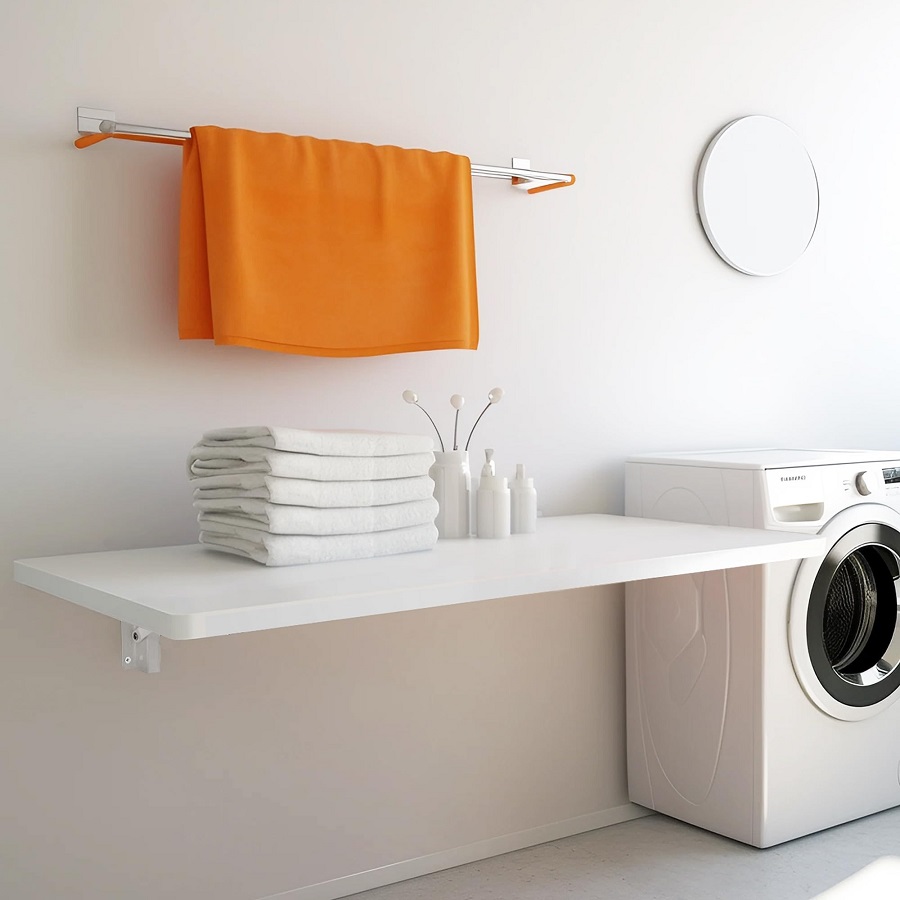
A laundry folding table is a game-changer in any home. It provides a dedicated space for sorting, folding, and organizing laundry efficiently. If you’re tired of folding clothes on your bed or couch, a folding table in your laundry room is the perfect solution. Not only does it make the task of laundry easier, but it also helps keep your laundry room tidy and functional.
When incorporating a laundry folding table into your space, you have the freedom to design it to fit your specific needs. Whether you have a small nook or a large laundry area, you can create a table that maximizes utility without sacrificing style. From choosing the right materials to adding custom features like space for laundry baskets, these tables are all about tailor-made efficiency.
They can also serve as a surface for other tasks, such as spot-cleaning garments or laying out delicate items to air dry. The beauty of a DIY laundry folding table is the personal touch you can add to it. This project offers a cost-effective way to enhance your laundry routine, often with only basic tools and a little bit of creativity.
Essential Tools and Materials
To embark on crafting your own laundry folding table, certain tools and materials are necessary. First, measure the intended space for your table to determine the quantity and size of materials needed.
Here are the essentials you’ll need for the structure:
- Table Saw: Crucial for smooth and straight cuts on wood.
- Miter Saw: Helps with precise angled cuts.
- Plywood (3/4 inch): The foundation for shelves, cut to your required dimensions.
- Wood Trim (1/4 inch by 3 inch): Used for aesthetic edging around the base and shelves.
- Screw Gun: For driving screws into the wood securely.
- Screws (2 inch): To hold plywood pieces together firmly.
- Brad Nailer: Makes nailing trim and other small wood parts easier.
Before starting, gather all the tools and materials in your workspace. Organize them to enhance efficiency and ensure a smooth workflow during the build.
The key is precision and customizability – cut the plywood to sizes suited for your space. Typically, you might use 6 plywood pieces for shelves and base structure. Following the measurements, assembly is straightforward with a helping hand.
While these tools and materials form the basis of your laundry folding table, creativity in design is your limit. Depending on your skill level and the complexity of your desired design, additional tools may be required.
Remember, safety is paramount. Always wear protective gear like gloves and goggles when operating power tools, and take your time to ensure exact measurements and cuts.
Step-by-Step Construction of the Shelf Base
Building the shelf base is straightforward with the right preparation. You’ll need the following tools: a table saw, a miter saw, a screw gun, and a brad nailer. Gather your materials: 3/4 inch plywood cut to the necessary sizes, wood trim for the base, 2-inch screws, and nails for the brad nailer.
First, cut the plywood using your table saw. You will need six pieces for the entire shelf. Following the cutting, begin assembling by holding two vertical plywood sides that measure 21 by 35.5 inches. Attach a 18 by 21-inch piece to the top with nails for initial stability. Then, pre-drill two holes on each side and use the screw gun to secure it with screws.
Next, add the bottom shelf. Position it three inches from the shelf base and secure it as you did the top shelf. Measure 15 inches above the bottom shelf and secure the middle shelf in the same manner.
Now, it’s time to attach the back piece of plywood. Screw it along the edges and where the shelves meet the back piece. Finally, take the wood trim and cut it to fit the front and sides of the shelf. Nail the trim into place for a polished look.
Before moving to the next steps, paint the shelf and slightly sand the edges for a rustic finish. With the shelf base completed, you’ll have built a sturdy foundation for your laundry folding table.
Securing and Preparing the Table Legs
Choosing the correct height for table legs is essential for comfort and functionality. First, set the shelf base in its final location. This will help you determine the needed length for your tabletop, which may vary depending on how many laundry baskets you want to fit underneath. For a laundry folding table that accommodates three baskets, consider the size of the baskets when deciding on table leg length.
Once you’ve determined the perfect height for your table legs, ensure they are the same height as the shelf base, typically around 35.5 inches for consistency. Place your butcher block countertop over the shelf on one end and position the table legs at the other, checking for levelness before securing them.
To anchor the tabletop, you’ll attach a ledger board on the wall side of the table. Cut the board to the correct length to span between the shelf and the table legs. The height should align with your previously built shelf base and table legs. Secure your ledger board into the wall studs to provide a stable fixing point for the countertop.
Lastly, prepare additional support by securing a piece of 2×4 wood between the table legs for additional rigidity. Add a smaller wooden block as an anchor point where the countertop will attach from underneath. This step ensures that your butcher block countertop remains stable and secure during use. With these steps completed, the physical structure of your laundry folding table is ready for the countertop installation.

Installing a Butcher Block Countertop
Installing a butcher block countertop on your laundry folding table adds both durability and style. First, ensure your shelf base and table legs are properly aligned and secured as they will support the countertop. Choose a butcher block that fits the length of the table you desire and is also strong enough to span the distance without bowing. Place the butcher block on top of the shelf base to assess fit and balance.
Once satisfied with the layout, secure the butcher block to the shelf base and table legs. Begin by attaching the ledger board to the wall, ensuring it is level with the table legs and shelf base. This step provides additional support for the countertop. Next, place the butcher block atop the ledger board and shelf base, checking again for a level fit.
To fasten the butcher block, secure it from underneath. Use a screw gun to drive screws through the ledger board into the underside of the countertop. If extra stability is needed, consider attaching the butcher block directly to the table legs. You can do this by pre-drilling holes and using screws that are appropriate for the thickness of your butcher block.
For a neat finish, fill any visible screw holes with wood putty. Sand the putty smooth once it dries and apply a sealant to protect the wood and give it a polished appearance. This step also makes cleanup easier and preserves the wood over time. Now your butcher block countertop is ready to use, offering a sturdy, spacious area for folding laundry.
Customization Options for Different Spaces
Creating a laundry folding table that fits your specific area requires careful planning and a dash of creativity. Customization is key to making the most of your space, whether it’s expansive or compact. Here’s how you can tailor your laundry folding table to different spaces:
- Measure Your Space: Begin by measuring the laundry area. This will guide the size of your table and the quantity of materials needed.
- Adjust the Base Size: If your space is narrow, scale down the width of the base. This ensures it doesn’t obstruct movement in the room.
- Variable Countertop Length: The countertop can be shortened or extended. This adjustment accommodates more or fewer laundry baskets based on your need.
- Multi-level Shelves: Consider installing shelves at different heights. This makes organizing various laundry items easier and more efficient.
- Fold-down Options: For smaller spaces, a fold-down table mounted to the wall saves precious floor space. You can flip it up when not in use.
- Height Adjustability: Adjustable legs can cater to the ergonomic needs of different users. It also allows you to modify the height as per your comfort.
Choosing the right customization for your laundry folding table is about understanding your needs and the limitations of your space. With these tips, your DIY project can be both a practical and stylish addition to your laundry routine.
When working on your laundry folding table, remember that the layout of your laundry room can influence the customization options. Consider how the door opens, the placement of appliances, and room for movement when designing your project. With careful planning and adjustable elements, your laundry folding table will enhance the functionality of even the most challenging spaces.

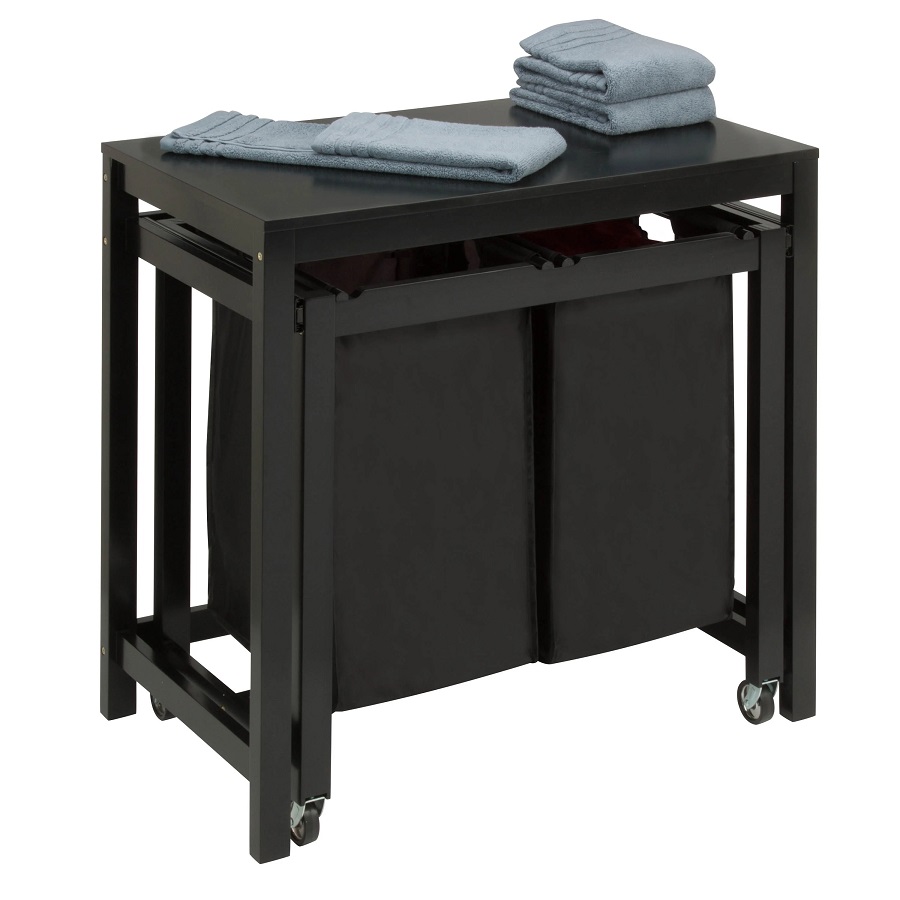
Additional Storage: Incorporating Laundry Baskets
Incorporating laundry baskets under your laundry folding table adds functionality and organization. After securing the foundation and countertop, tailor the space beneath for basket storage. Consider the following points:
- Measure Basket Dimensions: Before building, measure your laundry baskets. The height, width, and depth will inform the space needed.
- Customize Shelf Spacing: Adjust the distance between shelves to fit your baskets snugly. This maximizes storage and keeps baskets accessible.
- Easy Access Slots: Ensure there is enough clearance to slide baskets in and out without struggle. This promotes efficient use during laundry sorting and folding.
- Basket Material: Choose durable baskets that can withstand regular wear. Plastic or woven materials are common options offering longevity.
- Coordinate with Decor: Select baskets that complement the room’s aesthetics. Matching colors and styles create a cohesive look.
By customizing your laundry folding table to house laundry baskets, you streamline your laundry process. It’s a practical enhancement that enables you to sort and organize laundry directly on the folding table. Install baskets that are easy to clean and move. This provides a convenient system for managing clean and dirty laundry. Keep in mind the overall design of your DIY project; baskets should be both useful and visually appealing.
Final Touches: Painting and Sanding for a Rustic Look
When your laundry folding table is in place, it’s time for final touches. Painting can customize its look to fit your decor. Here are steps for that rustic appeal:
- Choose Paint Color: Pick a shade that complements the room. Consider light hues for small spaces to make them feel bigger.
- Apply Paint: Use even strokes to cover the wooden surfaces. Let the first coat dry completely before applying a second one if needed.
- Sanding Edges: Once the paint is dry, lightly sand the edges. This creates a worn, charming look typical of rustic furniture.
- Protective Coat: Apply a clear sealant to protect the paint. It helps keep the wood safe from moisture and wear.
Take your painted table to the next level by adding the sanding touches. They add character and texture, making your piece unique.
These final touches not only enhance the table’s look but also extend its life. A well-finished table is more likely to withstand the hustle of laundry days.
Remember, the goal is a balance between style and durability. Paint and sanding give your laundry folding table a rustic flair that stands up to the task.
Tips for DIY Project Success
When tackling a do-it-yourself project like a laundry folding table, follow these tips to ensure success:
- Plan Thoroughly: Start by sketching out your design. Consider the space and your needs carefully.
- Measure Twice: Double-check measurements before cutting. Accuracy is crucial in every step.
- Gather Materials: Ensure you have all the tools and materials before starting. This saves time and frustration.
- Seek Help When Needed: Don’t hesitate to ask for assistance. A second pair of hands can be invaluable.
- Take Your Time: Rushing might lead to mistakes. Work steadily and with purpose.
- Safety First: Always wear protective gear. Follow tool instructions to prevent accidents.
In addition to these steps, remember personalization is essential. A well-thought-out laundry folding table can make doing laundry a more pleasant experience. From the shelf base to the final paint job, let your crafting reflect your home’s unique style.
Finally, don’t forget to enjoy the process. This is your project, and seeing it come to life is part of the fun. Once completed, your practical and customized laundry folding table will bring ease and efficiency to your laundry routine.